Welcome to DIY cookie kits! A fun baking project with cookies‚ icing‚ and decorations․ Perfect for gifts or activities‚ offering a creative experience for all ages and skill levels․
What is a DIY Cookie Kit?
A DIY cookie kit is a thoughtful and creative project that includes pre-made cookies‚ icing‚ and decorations‚ allowing users to decorate their own treats at home; These kits are typically packaged in themed boxes with instructions‚ making them perfect for gifts or fun activities․ They offer a convenient way to enjoy baking and decorating without the hassle of preparing dough from scratch․ Ideal for all skill levels‚ DIY cookie kits are a great way to spark creativity and provide a hands-on experience for both kids and adults․ The kit usually contains all the necessary components‚ such as cutout cookies‚ piping bags of icing‚ sprinkles‚ and step-by-step guides‚ ensuring a delightful and stress-free baking adventure․ This concept has become popular for its simplicity and the joy it brings to homemade treats․
Why DIY Cookie Kits Are Perfect for Gifts or Fun Activities
DIY cookie kits are an excellent choice for gifts or fun activities due to their versatility and appeal․ They offer a personalized touch‚ allowing you to customize themes and designs to suit any occasion‚ such as holidays‚ birthdays‚ or parties․ The kits are ideal for all ages‚ making them a great activity for families‚ classrooms‚ or social gatherings․ Additionally‚ they provide a creative outlet‚ encouraging imagination and hands-on participation․ As a gift‚ they are thoughtful and practical‚ offering the recipient an engaging experience․ The kits are also budget-friendly and can be easily assembled with minimal supplies‚ making them a convenient option for those looking to share joy and create lasting memories․ Their adaptability and ease of use ensure they are a delightful choice for various settings and celebrations․
Supplies Needed for a DIY Cookie Kit
Cutout cookies‚ icing‚ sprinkles‚ plastic wrap‚ parchment paper‚ ribbon‚ cookie cutters‚ gift bags or boxes‚ recipe cards‚ and decorative stickers are essential for a complete kit․
Consumables: Cookies‚ Icing‚ and Decorations
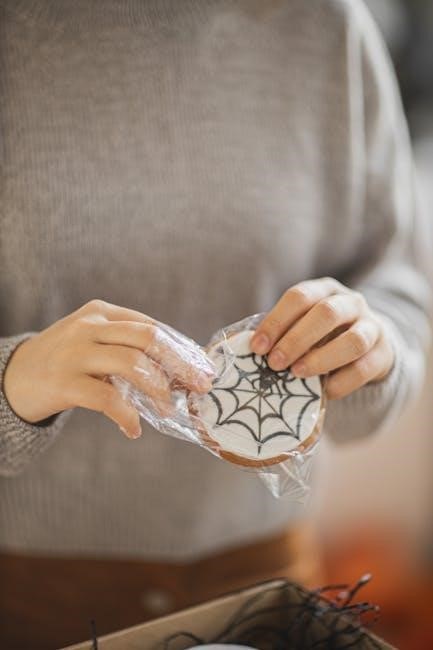
Your DIY cookie kit starts with freshly baked cutout cookies‚ available in various shapes using cookie cutters․ Include a batch of homemade icing for decorating‚ ensuring it hardens for a professional finish․ Add holiday sprinkles‚ edible glitter‚ or themed decorations to enhance creativity․ Plastic wrap and parchment paper keep cookies fresh and organized․ For a personalized touch‚ incorporate a recipe card with baking instructions and a few surprise decorations like candy eyes or sprinkles․ These components create a delightful‚ hands-on experience perfect for gifts or family fun․ Organize everything neatly‚ making it easy for anyone to enjoy decorating their own cookies at home or in a group setting․
Packaging: Boxes‚ Labels‚ and Printables
Packaging is key to making your DIY cookie kit visually appealing and professional․ Use a plain white pie box‚ which is affordable and easy to decorate․ The window on top showcases the kit contents beautifully․ Alternatively‚ opt for cake or bakery boxes in various colors or sizes․ Label the box with custom stickers or printables‚ including instructions for decorating․ Add decorative elements like ribbons or gift tags to enhance the presentation․ Printable templates are available online to simplify the process‚ ensuring a polished look․ Proper packaging not only protects the contents but also adds to the gift-giving experience‚ making it perfect for parties‚ holidays‚ or personalized gifts․
Step-by-Step Instructions for Assembling the Kit
Print and cut stickers for the box‚ placing one on the inner lid․ Add cookies‚ icing‚ and decorations․ Organize neatly and seal the box for a polished presentation․
Preparing the Cookies and Icing
Bake and cool cookies according to your chosen recipe․ For a DIY kit‚ portion dough into manageable amounts‚ like one-dozen cookies․ Allow cookies to cool completely on parchment-lined trays to prevent sogginess․ Next‚ prepare the icing by dividing it into small containers or piping bags‚ separating colors as desired․ If using a store-bought icing‚ ensure it’s ready to use․ For homemade icing‚ mix until smooth and vibrant․ Cut a small hole at the tip of piping bags for easy decorating․ Package cookies in plastic wrap or an airtight container to maintain freshness․ Include a few decorating tools like tips or spreaders․ Label icing containers with color names for clarity․ This step ensures everything is fresh and ready for the final kit assembly․
Decorating the Box and Organizing the Kit
Start by decorating the box with stickers‚ labels‚ or printables․ A 99 plain white pie box is ideal for its size and window feature‚ showcasing the kit inside․ Cut out stickers for the lid and sides‚ ensuring a polished look․ Add a ribbon or twine around the box for a finishing touch․ Inside‚ organize the cookies‚ icing‚ and decorations neatly․ Place cookies in a single layer to prevent breakage‚ and secure icing containers tightly․ Decorations like sprinkles or tips can be stored in small bags or compartments; Include a set of instructions and a recipe card for clarity․ This step transforms the kit into a visually appealing and functional gift or activity set‚ ready for gifting or enjoying immediately․
Tips for Customizing Your DIY Cookie Kit
Personalize your DIY cookie kit with seasonal themes‚ unique designs‚ and creative decorations․ Add extra toppings or a custom recipe card for a special touch․
Creative Ideas for Themes and Designs
DIY cookie kits can be personalized with creative themes like holiday cookies‚ seasonal designs‚ or special occasions such as birthdays or weddings․ For a festive touch‚ use cookie cutters in shapes like hearts‚ stars‚ or animals․ Add themed decorations like sprinkles‚ edible glitter‚ or colored icing to match your chosen theme․ Consider seasonal themes‚ such as winter snowflakes‚ summer flowers‚ or Halloween ghosts․ Kids love kits with fun designs like dinosaurs‚ unicorns‚ or cartoon characters․ Custom labels or stickers with the recipient’s name can make the kit extra special․ You can also include a small recipe or instruction card with decorating tips or fun facts․ Mixing and matching themes and designs allows for endless creativity‚ making each DIY cookie kit unique and personalized․
Troubleshooting Common Issues
When assembling your DIY cookie kit‚ common issues may arise․ If cookies spread too much during baking‚ ensure your oven temperature is accurate and dough is chilled properly․ For icing that’s too thin‚ add powdered sugar; if too thick‚ mix in a little milk․ If decorations stick to the box‚ lightly dust them with cornstarch․ Air bubbles in icing can be pierced with a toothpick․ Smudged designs can be fixed with a small dab of icing․ If cookies break‚ use icing as “glue” to repair․ For drying times‚ let iced cookies sit for 4-24 hours․ Always use fresh ingredients for best results․ These tips will help you overcome common challenges and ensure your DIY cookie kit turns out perfectly․
Congratulations! You’ve completed the guide to creating your own DIY cookie kit․ This fun and creative project is perfect for gifts‚ family activities‚ or personal enjoyment․ By following the steps and tips provided‚ you can craft a beautifully packaged and deliciously customizable cookie kit․ Whether you’re a seasoned baker or a beginner‚ this project offers a rewarding experience․ Remember‚ the key to success lies in preparation‚ creativity‚ and attention to detail․ Don’t hesitate to experiment with themes‚ decorations‚ and recipes to make your kit truly unique․ With these instructions‚ you’re ready to embark on a delightful baking adventure․ Happy decorating and enjoy the sweet satisfaction of your homemade DIY cookie kit!